Friday 23 December 2011

Merry Christmas

To all of my friends, family, faithful readers, supporters and customers, I want to wish you a very Merry Christmas and a blessed and joyful 2012.  Thank you all for your love and support throughout this year, which has probably been the hardest I've faced so far.  I appreciate your sweet comments and constant encouragement through each step of my life and my business.

I bring you good news that will cause great joy for all the people. Today in the town of David a Savior has been born to you; he is the Messiah, the Lord.  Luke 2:10-11 (NIV)


Wednesday 21 December 2011

Last Minute Christmas


Yes, I'm still rushing around trying to get ready for Christmas and keep remembering things I've left off my "to do "list!  Yesterday was spent internally debating with myself whether to let the girls make Christmas ornaments or special Christmas cards for their cousins (all three of them, LOL).  In the interest of simplicity, I went with the card option, and here is the card my cheeky monkeys designed.  Of course, I was left to do the difficult bits (such as adhering the fabric onto the card blank with heat 'n bond and working the hot glue gun), but they did the rest.  Are you fully prepared for Christmas?  Or are you starting to feel a rising panic???

Monday 19 December 2011

DUST Team Christmas Swap

After all the fun I had participating in the last DUST craft swap, I decided that I most definitely had to join the Christmas swap!  It was decided that the Christmas swap would be run under a kris kringle/secret Santa format where recipients wouldn't know from whom their gift was coming until it arrived.  The secrecy involved in this swap has added a lot of excitement to the whole affair and I can tell you that I was very excited when a large package arrived on my front doorstep!

image spoon pendant necklace purple resin delicious designz get spooned
A gorgeous spoon pendant!

shabby chic fabric Christmas wreath
My girls and I love this shabby chic fabric wreath

I was so thrilled to see that my package was from Del of Delicious Designz.  Del creates the most amazing resin jewellery (my sister and I are proud owners of Del's funky resin bangles) and fun crochet hats, beanies and shoes.  And how lovely are the surprises she sent to me?!?!  I have admired Del's spoon pendants for some time now and I have worn the necklace she sent to me almost every day!  I also have a fondness for Christmas wreaths and Del's fabric wreath brought a big smile to my face.  My girls love it too, especially the crocheted hearts dangling from the wreath hanger.  Thank you so much Del, we will love your creations for a long time to come!!!

beaded book mark Two Cheeky Monkeys
vintage encyclopaedia text Christmas ornament beaded

Here are photos of two of the items I sent to my recipient: a beaded book mark and a vintage text Christmas ornament.  The ornament is a brand new design which I had a lot of fun creating but I wasn't able to roll it out in time for Christmas this year.  The cameo setting holds a snippet of text from a vintage encyclopaedia and a is a definition of the word "rose", one of the favourite flowers of my recipient.  What do you think?  Would you hang these ornaments on your Christmas tree? 

Friday 16 December 2011

Edible Christmas Ornament Tutorial

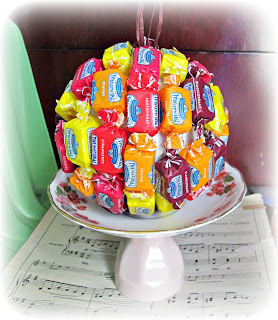
edible Christmas ornament ball lollies candies sweets

It's been a while since I've put together a tutorial for this blog so I thought I would share a quick tutorial for the edible Christmas ornaments I made as small thank you gifts this year.  My idea for these came from the various Christmas trees and wreaths I've seen in blogland which have been made with a variety of lollies and candies.

Materials
Styrofoam balls (I used 9cm balls)
Curling ribbon, raffia or decorative cord
Hot glue gun and glue sticks
Lollies/candies/sweets of your choice (I used wrapped, soft chew lollies but use whatever is your favourite and make sure you have enough to cover your entire ball)

Method

The most important thing to do first is to turn on your hot glue gun so that you don't have to twiddle your thumbs while you're waiting for it to heat up!  If, like me, you are terrible at estimating mid points on objects and/or a bit OCD about things being precise, measure your foam ball and mark the top and bottom (or north and south pole, if you like).  This will give you a guide for attaching and tying the ribbon hanger for the ornament.


Cut a length of the curling ribbon so that it is long enough to wrap around the foam ball as well as tie into a loop for hanging.  Find the mid point of your ribbon and glue this to your marked point on the bottom of the ball.  Following the manufacturer's line that usually runs around the middle of foam balls, wrap both ends of the ribbon around the ball and tie a double knot at the mark on the top of the ball.  Glue the knot down and then tie the ends of the ribbon to make a ribbon loop for the ornament.


Okay, now for the fun part!  Trying not to eat too many of your supply of lollies, glue a row of lollies around the middle of the ball, covering up your ribbon as you go.  I think at this point that I should suggest using a low melt glue gun so that the hot glue doesn't melt your foam ball or your lollies.  The added advantage of low melt glue guns is that your screams of pain will be less if you should accidentally put your fingers on the glue instead of the lollies (as I did a few times because I'm uncoordinated).


Once you have attached the first row of lollies, keep gluing on rows of sweets, making sure to pack them as close together as possible so that the foam ball doesn't show through.  Keep reminding yourself that you cannot eat too many of the lollies or you won't have enough to cover the foam ball!


Once you have completely covered the foam ball in lollies, you can hang it up to display!  If you are giving these as gifts, you might like to wrap them in cellophane or tissue paper to add an element of surprise to the gift, or you could include one as part of a festive foods hamper.  The beauty of using wrapped lollies, as I have done, is that your recipient can safely eat the goodies attached to the foam ball without worrying about how much glue (or germs from inquisitive and grubby little fingers) they're consuming in the process!  The possibilities are endless with this project, limited only by the availability of suitable lollies at your local store.  For those who would like to use unwrapped lollies or candies, you could try attaching your lollies to the foam ball with icing or melted chocolate to eliminate the worries about mixing glue and food.

Wednesday 14 December 2011

My Creative Space

Christmas ornament pudding eco recycled felt sewing kit

I have been meaning to blog about this cute little project for some time now and I've finally gotten around to doing it!  In October, I was blessed to be one of the winners of the Sister Outlaws giveaway during Blogtoberfest.  What did I win?  Two very cute Christmas ornament kits consisting mostly of recycled materials and supplies.  Isn't that such a great idea?  So far the monkeys and I have managed to make the ornaments from the Christmas pudding kit.  The pieces of the candle ornament kit are sitting on my craft desk waiting for me to put them together...  Have you been making your own Christmas ornaments this year?

Friday 9 December 2011

Rainbow Lollies Giveaway Winner


Congratulations to Lee who is the winner of last week's feature Friday giveaway by Rainbow Lollies!  Having seen Cassie's cute creations in person, I know Lee will love her prize.  For everyone else who entered Cassie's giveaway, thank you for your support and don't forget to visit Rainbow Lollies regularly to see what's new instore.

Flowers and Filigree: New Headbands in the Making

You all know how much I love wearing and making headbands!  And because of my black hair, I generally prefer to wear headbands made in a darker color, such as black or brown, no matter how colourful the headband adornment.  So when I recently sold out of all the antiqued brass headbands in Two Cheeky Monkeys, I knew I had to get cracking and make some more before Christmas!  The previous batch that I made featured chrysanthemum cabochons but I got a bit more "adventurous" with this lot and used a range of floral cabochons.  Although I'm not a huge fan of pink, the Roslyn headband (top left) is definitely my favourite, design wise.  Which one would you wear?  And if you prefer a silver headband instead of my darker options, there are still several of this style in stock in both my Etsy and Madeit stores.

montage headband flower cabochon and filigree Two Cheeky Monkeys
2. Michaela headband
3. Liesel headband
4. Joleen headband

Thursday 8 December 2011

Festive Food Roundup

You should all know by now just how much I LOOOVE celebrating Christmas, so you won't be surprised to find that there may be a lot of Christmas-related posts this month.  Although Christmas this year will be a bit of a sad one for my family and me because it will mark the six month anniversary of my dad's passing, we can still joyously commemorate the birth of my dad's Saviour (and ours too), Jesus Christ.  Today's post is a roundup of festive food tutorials full of fun food ideas for your Christmas celebrations or for gift giving to friends and family.  Enjoy!

photo montage festive food Christmas macarons cake cupcakes cake pops candy sweets tree

L-R from top left corner:
1. Christmas Candy Trees by Life is a Party
2. Christmas Tree Cupcakes by Bakerella
3. Gingerbread House by oopsey daisy
4. Eggnog Cake by Bakingdom
5. Cupcake Wreath by Party Like Paula
6. Christmas Macarons by Sweets and Loves...

Wednesday 7 December 2011

My Creative Space - Christmas

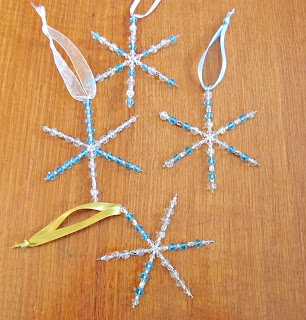
beaded snowflake ornament aqua silver white

A few months ago I bought a set of snowflake wire blanks with the thought that the cheeky monkeys would just love to create some beaded snowflake ornaments.  After four days in a row of beading, complaining about dropped beads and going cross-eyed, we finally have a set of beaded snowflake ornaments for our Christmas tree!  The monkeys had a lot of fun choosing which beads to use and deciding on the designs, although they did find threading seed beads onto the thick-ish wire a bit trying for their little fingers.  I prefer the snowflakes which have the same design on each spoke, but they are all so pretty and sparkly hanging on our tree that I can't help but smile when I see them all.

beaded snowflake ornament black burgundy wine pink

Monday 5 December 2011

Monday Inspiration - Give New Life to Old Books

As you all know, I just loooove to upcycle old and unloved books into new and beautiful creations.  So today's post is an inspiration board of creative ways of re-using old books (including a few of my own creations, wink wink).

photo montage vintage book altered art brooch purse safe dictionary print pencils wreath journal ornament cross flower

From L-R starting at the top left corner:
1. Hollow book safe by Secret Safe Books
2. Book Purse by The Write Stuff
3. Flower Ball Ornament by Greencycledesigns
4. Alice in Wonderland Brooch by Two Cheeky Monkeys
5. Cross Ornament by Moose and Nigel
6. Recycled Book Journal by red punch buggy
7. Vintage Book Wreath by Simple Joys Paperie
8. Chandelier Dictionary Print by Two Cheeky Monkeys
9. Athena Pencils by missIsa

Friday 2 December 2011

Feature Friday - Rainbow Lollies


My featured artist for the week is a fellow creator whom I met through DUST and I have also had the lovely opportunity to meet her in real life too!  So let me introduce Cassie of Rainbow Lollies!

Tell us a bit about yourself.
Hello lovely people. Firstly thank you to Deb of Two Cheeky Monkeys for featuring me as one of her Friday Featured sellers. Since you are here that means you are somewhat curious as to who I am. I am Cassie and I am a craftaholic. Ok maybe not that bad but I certainly have a very busy life. On days when I am not working as a Payroll Administrator (my day job), I am looking after my active toddler and making sure that there is always dinner on the table for hubby. Oh did I mention that I also run my little handmade business online called Rainbow Lollies? My hobby is crafting (if you have not guessed it by now) and also reading (children books are my favourite). I think that chocolate should be zero calories and yet still yummy. A day should have more than 24 hours so I have time do all things I have to do. We can still function like normal human beings despite having very little sleep.

Dr Who cufflinks!!!

Describe yourself in five words.
Shy, busy, sweet, dreamer, easily excitable (ok that was a phrase - sorry exceeded my 5 word limit!)
 
When and how did you first start crafting/creating?
My earliest crafting memory was when I started making board games from pieces of plain cardboard because my brother and I got bored with the store bought ones. I think I was around 9 or 10 years old. I also made a scrapbook filled with my drawings of animals and stories to go with it.
 
What do you create and what are your favourite materials with which to work?
I love trying out all kinds of craft. My creative space is like a natural disaster. Forever messy and filled to the brim with all kinds of projects. My Rainbow Lollies label carries a range of cufflinks, earrings as well as fun accessories like brooches and key rings. I must say my favourite material will always be Japanese fabric simply because I love anything cute (and the Japanese are well known for that!)

Christmas button magnets
 
When and how did you start selling online?
I started selling online a little over a year ago. I remembered thinking that I really want to be able to work from home and spend more time with my son. Of course I don't want just any work. I want to do something that I am passionate about, which is to be able to sell something that I make myself. I did some Googling and stumbled upon Etsy. Googled some more and then found Madeit. Both sites I fell in love with and decided to set up online stores to try my luck.
 
Describe your store in five words.
Fun, colourful, cute, happy, quirky.
 
Who or what are the influences behind your creations?
I would say children because the world always look different when you see it through their eyes. Also the handmade community. Everyone is talented in their own way and I am constantly amazed and inspired by the new creations that pop up daily.

Pink apple keyring
 
Where can we find you online?
I am on these social sites and I would love it if you could hang around longer
Twitter : www.twitter.com/rainbowlolllies
FB : www.facebook.com/rainbow.lollies.handmade
Blog : http://www.rainbowlollies.blogspot.com/
Store : www.madeit.com.au/rainbowlollies or http://www.rainbowlollies.etsy.com/

Special Offer:
Both my Madeit and Etsy shops are having a pre-Christmas sale where you get 10% off any item (excluding shipping). Mention "Two Cheeky Monkeys" in the message to seller when you checkout and I will include a bonus gift in your package.

And a GIVEAWAY!
Cassie is offering a lucky dip pack including 1 pair of button earrings, large button hair elastic, large paperclip bookmark and 2 button magnets valued at $20.  What do you have to do to win?

Do any of the following and leave me a SEPARATE comment for each entry:
1. Tell me your favourite item from Cassie's stores.
2. Follow my blog or Cassie's blog.
3. Follow me or Rainbow Lollies on Twitter.

This giveaway is open worldwide and a winner will be drawn at 8pm (AEDT), December 8 using random.org