Monday 25 February 2013

Things I Love - Edible Decorations

Today's post starts with a confession: as much as I love a good party, I really don't like planning, catering for or throwing parties, especially if they're at my home!  I'm not sure if it's because I'm a bit of a control freak who always ends up biting off more than I can chew, or if my aversion to hosting parties is due to the fact that they exhaust me, but the fact is, my stress levels always increase significantly when anyone in my family says, "Let's have a party".
 
image edible paper wafer butterflies butterfly cake decoration sugar robot
 
This is one of the reasons (among several) why we only allow the cheeky monkeys to have a birthday party every second year.  As it happens, this year is an appointed "birthday party year", and the monkeys are already planning what kind of parties they want, who they'll invite and, most importantly, what they want their birthday cake to look like.
 
image edible paper wafer cookie pixie decoration birds tropical
 
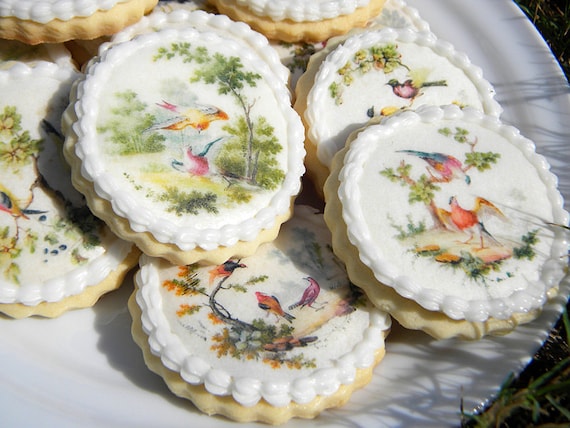
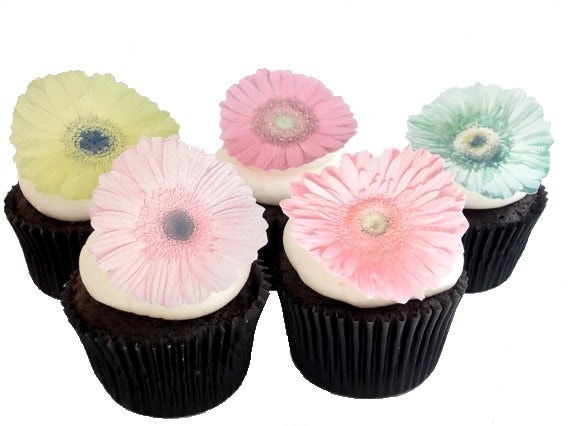
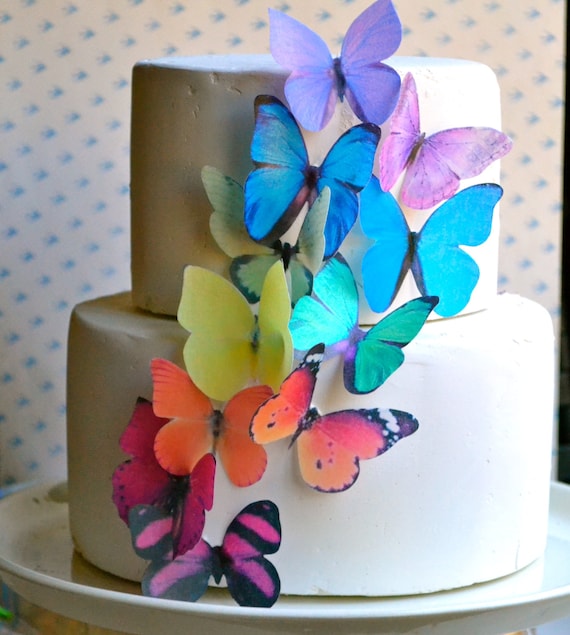
Of course, since they're both born later in the year and their birthdays are still far off, their ideas keep changing and morphing, depending on their mood!  Currently, we're all a little enamoured of paper wafer decorations for cakes, cupcakes and cookies.  For someone like me, who has a bit of a love-hate relationship with the icing and decorating of birthday sweet treats (just ask Mr Cheeky Monkeys, ohhh the stories he could tell you!), the idea of using these gorgeous edible decorations appeals to me very much!  The examples you see in this post are from three different Etsy stores that caught my eye, all of which, very importantly, ship to Australia for a reasonable cost.  Have you used edible paper wafers in your cake or cookie decorating?  If you have, how did you find it?  Did you get the results you were wanting or will you stick to traditional decorating techniques in future?
 
image incredible toppers edible cake toppers flower flowers wafer paper


Friday 22 February 2013

My Creative Space

image embroidery dropcloth sampler blanket stitch closed blanket double buttonhole wheel sloping

I recently received a subscription to a monthly embroidery sampler by Dropcloth, a fun embroidery store on Etsy.  Each month's sampler focusses on one embroidery stitch and its variants, helping novice stitchers to learn new stitches and also inspiring more experienced embroiderers.  This month's stitch is blanket stitch, and I have had a lot of fun working on this sampler because I love blanket stitch.  Once I finish working on this sampler, I'm going to get cracking on last month's sampler, which featured couching, which is not one of my favourite stitches.  So tell me, what is your favourite embroidery stitch?  Or are you a novice stitcher who could use a few Dropcloth samplers to help you out?

Wednesday 20 February 2013

Funky Neon Necklace Tutorial

image diy neon bar necklace tutorial green silver

For those of you who have been eagerly awaiting my promised neon necklace tutorial since you read last week's post, wait no more!  I finally had a bit of time to sit down and think through each step of my creative process.  My neon bar necklaces have been a lot of fun to make, and it's certainly easy to find one of these BRIGHT Swarovski beads should you happen to drop one onto the carpet!  If you have any questions about the tutorial, please feel free to contact me and I'll see if I can explain myself better, he he he.

Supplies
- 22 gauge beading wire in finish of your choice
- 5 x 8mm Swarovski crystal neon pearls
- 2 x 22cm length of chain to match your beading wire
- 3 x 4mm jump rings
- 7mm jump ring
- lobster or bolt ring clasp
- jewellery pliers (round nose, half flat nose or flat nose and cutting)

image diy funky neon necklace tutorial bar swarovski crystal pearl green thread beads onto the wire

1. Thread your Swarovski beads onto the 22ga beading wire (you may be able to use 20 or 18ga wire, but I found this a tight fit in my beads).  Leaving the wire attached to the main spool, push the beads down the wire till you have a 3-4cm long wire tail.
 
image diy funky neon necklace tutorial bar swarovski crystal pearl pink
 
2. Using your half flat or flat nose pliers, bend the wire to make a roughly 90 degree angle, leaving about 1.5cm of wire tail (you may want to leave more if you're new to wire wrapping).
 
image diy funky neon necklace tutorial bar swarovski crystal pearl green bend wire around pliers to create a closed end
 
3. Using your round nose pliers, hold the tail of wire near the bend and wrap the wire round the pliers to create a loop.
 
image diy funky neon necklace tutorial bar swarovski crystal pearl pink wrap tail of wire around main wire to create a wire wrapped loop
 
4. Carefully bend the tail of wire around the main length of wire (the bit the beads are on) 2-3 times to create a wire-wrapped loop.  Snip off any excess wire with your cutting pliers and press the cut end flat against the main wire with your flat nose pliers (this prevents scratches and snags on clothing from any rough ends of wire).
 
image diy funky neon necklace tutorial bar swarovski crystal pearl green
 
5. Push the beads tightly against your newly formed loop, then snip the wire, removing your row of beads from the main spool of wire, making sure you leave a 2-3 cm tail to work with.  Make a wire-wrapped loop at the newly cut end as you did in step four.  With your hands, gently shape your "bar" of beads to give a nice curve to your necklace.  If you prefer an angular or sharp geometric look, you can flatten out your bar to make it as straight as possible.
 
image diy funky neon necklace tutorial bar swarovski crystal pearl green attach chain to bar of beads with jump rings
 
6. Attach one length of chain to your bead bar using a 4mm jump ring, then attach the 7mm jump ring to the loose end.  Attach the remaining length of chain to the other side of the bar.  Then attach the clasp to the other end of that chain using the last 4mm jump ring.
 
image diy funky neon necklace tutorial bar swarovski crystal pearl green pink
 
7. Now wear your eye-catching, neon bar necklace with pride!  You can easily change the length of this necklace by altering the length of the chains used in step six and you can give your necklace a more subtle or bolder look by changing the size of the beads used too.  If you really love neon, you could make yourself a necklace in each of your favourite neon colours or mix and match different colours on the one necklace.
 
For those of you who don't feel up to making one of these super bright necklaces for yourself, you can find them in a range of neons in both my Etsy and Madeit stores; they've each been made with plenty of love and 1980s nostalgia!

Monday 18 February 2013

Things I Love

image lotus garden paperweight lampwork glass sphere morning light glass
 
I adore glass creations and have long had a bit of a thing for lampwork glass items, be it beads, pendants, jewellery, sculptures or homewares.  So I am pretty stoked to have found Morning Light Glass Lampwork Art on Etsy, a store full of stunningly beautiful lampwork creations!
 
image sky blue seahorse ornament lampwork glass suncatcher
 
This amazing store is full of the most gorgeous lampwork paperweights and glass cabochons as well as pretty ornaments and glass artworks for your home.  I am especially loving the paperweights and floral glass sculptures, though I fear that with two small monkeys, such items wouldn't last long in my home before they were "accidentally" knocked off a shelf or display spot.  Perhaps one day I will own one of these pretties...
 
image glass flower bowl sculpture artisan crafted lampwork glass blue yellow


Friday 15 February 2013

Crazy For Neon

image neon fluoro bar necklaces silver orange yellow pink green two cheeky monkeys
 
As a child growing up in the '80s, I was a huge fan of fluoro and neon colours, and made a point of wearing fluoro yellow and/or pink quite often.  While I kind of cringe when I look back at those old childhood photos of me in my "you can't miss me" outfits, the passion for neon seems to have taken hold of a new generation and is back in vogue.  So, prompted by my children and those of my Two Cheeky Monkeys fans who love neon, I will be adding a small range of neon necklaces to my bar necklace range.  These bright pretties feature Swarovski pearls in neon colours and will soon be available in both my Etsy and Madeit stores.  And keep watching this space because next week I will be posting a little tutorial showing you how to make your very own neon bar necklace!

Wednesday 13 February 2013

DIY Gumball Necklace

image gumball necklace polymer clay sculpey pink purple grey blue baker's twine tutorial diy

The cheeky monkeys and I had a lot of crafty fun over their school summer holidays, and I am finally getting around to sharing some tutorials of the creations we made.  Today's tutorial is for a very simple "gumball" necklace which even small children can attempt with little adult help (the oven is the main step requiring adult intervention).  And the beauty of this project?  You can easily make it in a multitude of colour schemes and designs!

Materials
- your favourite brand of polymer clay (I happened to use Sculpey)
- baker's twine in the length you want for your necklace
- jewellery crimps or cord tips
- 5mm and 7mm jump rings
- bolt ring clasp or lobster clasp
- gel superglue
- wooden skewer
- jewellery pliers
- sharp implement for cutting clay (I used an old store VIP card)

image polymer clay gumball grey gray sculpey

1. Cut off a roughly 2cm by 2cm piece of the polymer clay and condition it according to the packet instructions.  Roll your clay into a ball shape between your palms.

image diy gumball necklace sculpey polymer clay use a skewer to make a hole in your bead

2.  Turn your clay ball into a bead by carefully inserting a wooden skewer through the centre.  Just as carefully remove the skewer, then gently re-roll your bead to get it back into shape.  Make sure that your bead hole is nice and centred and open at both ends.

image diy gumball necklace sculpey polymer clay

3. Continue making gumball beads in your desired colours.  You can even mix two or three different colours together to create multicoloured, swirled beads.  When you have as many beads as you need (I made five beads per necklace, but any odd number of beads will generally look good), bake them according to the clay manufacturer's instructions.

image diy gumball necklace tutorial add jewellery crimps to the ends of the baker's twine

4. While you are waiting for the beads to bake and cool down, cut the baker's twine to your desired necklace length.  Once the beads are cool, thread them onto the twine and move them to the centre of the twine.  Take one jewellery crimp and add a dab of gel superglue to the base.  Carefully place one end of your twine onto the crimp and glue and squeeze the crimp shut.

image diy gumball necklace tutorial add jewellery crimps to the ends of the baker's twine

5. Repeat for the other end of the baker's twine and clean up any excess glue which has squeezed out the ends.  Leave your necklace in a well-ventilated area to allow the glue to cure and dry.

image gumball necklace polymer clay sculpey pink purple grey blue baker's twine tutorial diy

6. Once the glue has dried, attach your bolt ring or lobster clasp to one end with the 5mm jump ring.  Attach the 7mm jump ring to the other end, and voila, you have your gumball necklace!

Variations
1. Any kind of string or cording can be used for this necklace.  If you make large enough holes in your clay beads, you can even string them onto fine chain.
2. Want something a little different?  Try shaping your clay beads into cubes or faceted geo shapes.  Cubes can probably be easily molded by hand, but I would recommend using a sharp knife to cut the facets for geo beads.

Monday 11 February 2013

Do you love Mr Darcy?

image mr darcy wristlet purse pride and prejudice jane austen spoonflower fabric

This might come as a bit of a shock to those of you who love my Pride and Prejudice range of jewellery and accessories, but I am not a huge fan of Jane Austen's famous novel.  I've discussed this many times with Mr Cheeky Monkeys (who happens to quite like the book and the BBC adaptation) and I think the main reason for my apathy towards this much-loved story is that I find many of its characters to be highly irritating and silly.

image mr darcy wristlet purse pride and prejudice elizabeth bennet jane austen spoonflower fabric

However, I realise that these are just fictional characters in a book, and I can understand why so many around the world love Jane Austen's story and especially love Mr Darcy.  Which is why I first started making my literary-inspired line of jewellery and why, when I saw this fabric for sale, I decided I just HAD TO make a P&P purse for my sister-in-law's 30th birthday.  (And hopefully she has not recently started reading my blog without my knowledge!)

image mr darcy wristlet purse pride and prejudice mr darcy's proposal jane austen spoonflower fabric chevron black white riley blake

I found this delightful fabric at Spoonflower, and had to resist the temptation to purchase lots of amazing fabric designed by amazing artists.  The fabric features a cartoon depiction of Mr Darcy and Elizabeth Bennet as well as Mr Darcy's infamous first proposal to Elizabeth.  The wristlet lining and carry loop were made from Riley Blake chevron fabric, which I felt nicely complemented the P&P fabric (and who can resist chevron?)  I am really quite pleased with my stroke of genius, and sincerely hope my sister-in-law loves her present when we give it to her in a few weeks' time!  So tell me, are you a Mr Darcy fan?  Or are you a bit of a cynic like me???

image pride and prejudice wristlet riley blake chevron black and white fabric

Friday 8 February 2013

Christmas in February???

image christmas bauble ornament pink floral damask pretty little things fabric dena designs free spirit tone finnanger pattern lace
 
I know, today's post title has probably got you thinking, "What?  Isn't it bad enough there are hot cross buns and Easter eggs in the stores without cashing in on Christmas too?!"  And I wouldn't blame you for thinking that way, as much as I like making Christmas ornaments, it has definitely been a little strange working on one in February.  However, the reason I'm making Christmas ornaments at this time of the year is that a while back, I joined a Christmas ornament swap where each month participants make an ornament for a fellow swapper according to the month's colour scheme.  This month's colour is pink, so I pulled out my stash of pink Pretty Little Things fabrics by Dena Designs and adapted a cute Tone Finnanger pattern to create a pink, plushie Christmas bauble.  What do you think?  Would you fill your tree with plush baubles?

Monday 4 February 2013

Make Your Own Scratch Off Card

I recently signed up for a few fun swaps on Swap Bot and wanted to share with you all a fun technique I learned while working on one of my swaps.  The swap I'm referring to is a literary postcard swap where individuals from different countries send interesting postcards to each other.  Where does the "literary" part come in?  Well, instead of a message of greeting on the postcard, we have been asked to write out a paragraph or two from a book we love.  And just in case our recipient can't work out the book, we also need to hide the book title somewhere on the postcard.
Well, I am not particularly clever at hiding phrases or hints of a phrase within other words (ciphers are not my forte!), so I decided to use the good old game scratch card method of "hiding" my book's title.  A quick online search yielded multiple tutorials for making your own scratch off cards, here are three similar, but slightly different, ones I particularly liked.
image diy tutorial make your own scratch off card

image diy tutorial make your own scratch off card

image diy tutorial make your own scratch off card