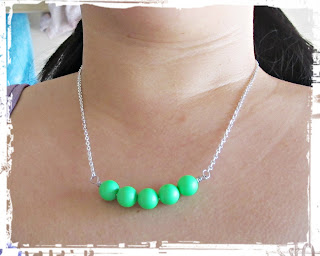
For those of you who have been eagerly awaiting my promised neon necklace tutorial since you read last week's post, wait no more! I finally had a bit of time to sit down and think through each step of my creative process. My neon bar necklaces have been a lot of fun to make, and it's certainly easy to find one of these BRIGHT Swarovski beads should you happen to drop one onto the carpet! If you have any questions about the tutorial, please feel free to contact me and I'll see if I can explain myself better, he he he.
Supplies
- 22 gauge beading wire in finish of your choice
- 5 x 8mm Swarovski crystal neon pearls
- 2 x 22cm length of chain to match your beading wire
- 3 x 4mm jump rings
- 7mm jump ring
- lobster or bolt ring clasp
- jewellery pliers (round nose, half flat nose or flat nose and cutting)
1. Thread your Swarovski beads onto the 22ga beading wire (you may be able to use 20 or 18ga wire, but I found this a tight fit in my beads). Leaving the wire attached to the main spool, push the beads down the wire till you have a 3-4cm long wire tail.
2. Using your half flat or flat nose pliers, bend the wire to make a roughly 90 degree angle, leaving about 1.5cm of wire tail (you may want to leave more if you're new to wire wrapping).
3. Using your round nose pliers, hold the tail of wire near the bend and wrap the wire round the pliers to create a loop.
4. Carefully bend the tail of wire around the main length of wire (the bit the beads are on) 2-3 times to create a wire-wrapped loop. Snip off any excess wire with your cutting pliers and press the cut end flat against the main wire with your flat nose pliers (this prevents scratches and snags on clothing from any rough ends of wire).
5. Push the beads tightly against your newly formed loop, then snip the wire, removing your row of beads from the main spool of wire, making sure you leave a 2-3 cm tail to work with. Make a wire-wrapped loop at the newly cut end as you did in step four. With your hands, gently shape your "bar" of beads to give a nice curve to your necklace. If you prefer an angular or sharp geometric look, you can flatten out your bar to make it as straight as possible.
6. Attach one length of chain to your bead bar using a 4mm jump ring, then attach the 7mm jump ring to the loose end. Attach the remaining length of chain to the other side of the bar. Then attach the clasp to the other end of that chain using the last 4mm jump ring.
7. Now wear your eye-catching, neon bar necklace with pride! You can easily change the length of this necklace by altering the length of the chains used in step six and you can give your necklace a more subtle or bolder look by changing the size of the beads used too. If you really love neon, you could make yourself a necklace in each of your favourite neon colours or mix and match different colours on the one necklace.


Great tutorial! I like this! I have some leftover beads that would be perfect to use in creating a necklace like this! Thank you for sharing the tutorial!
ReplyDeleteSo perfect for Spring! I really need to do more DIY jewelery. Thanks for the inspiration and instructions.
ReplyDelete