
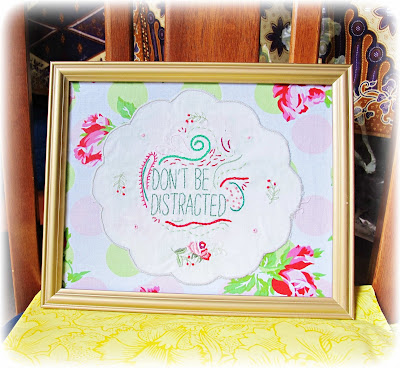
As promised the other week, I have put together a tutorial for making your own shabby chic wall art. You may already have some, or all, of the required supplies on hand, which would make this a very affordable and quirky piece of art for your walls! If you are looking for a fun pattern to use, be sure to visit the Wild Olive blog for lots of free patterns as well as patterns available for purchase.
Supplies
- vintage cotton or linen doily
- embroidery pattern of your choice
- embroidery floss to match or complement any embroidery already on the doily
- embroidery needle
- embroidery hoop
- scissors
- fabric to match or complement the embroidered doily, you will need enough to wrap the backing board of the picture frame
- picture frame large enough for framing the doily (I used a slightly battered frame from my local op shop)
- spray adhesive or double-sided tape
Method
1. Make sure your doily is as clean and wrinkle free as possible. This can be a little difficult with vintage doilies, but can be done with a little care. Next, lay your doily over your intended embroidery design to make sure it fits nicely into the available space. If your design is too small or too big for your doily, you can adjust the sizing with your photocopier or photo editing software.

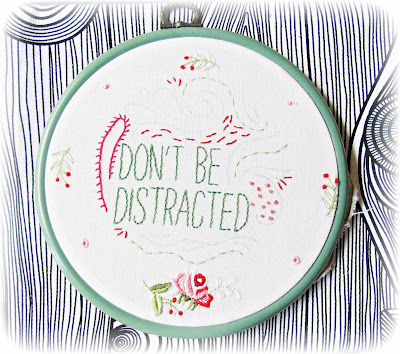
2. Transfer the embroidery pattern to the doily using either a lightbox (or well-lit window) to help you trace the design or an iron-on pattern transfer method. Carefully place the doily in the embroidery hoop and decide on the colours you wish to use for your pattern. I chose to use colours which matched (as much as possible) the existing embroidery on my doily.


Supplies
- vintage cotton or linen doily
- embroidery pattern of your choice
- embroidery floss to match or complement any embroidery already on the doily
- embroidery needle
- embroidery hoop
- scissors
- fabric to match or complement the embroidered doily, you will need enough to wrap the backing board of the picture frame
- picture frame large enough for framing the doily (I used a slightly battered frame from my local op shop)
- spray adhesive or double-sided tape
Method
1. Make sure your doily is as clean and wrinkle free as possible. This can be a little difficult with vintage doilies, but can be done with a little care. Next, lay your doily over your intended embroidery design to make sure it fits nicely into the available space. If your design is too small or too big for your doily, you can adjust the sizing with your photocopier or photo editing software.

2. Transfer the embroidery pattern to the doily using either a lightbox (or well-lit window) to help you trace the design or an iron-on pattern transfer method. Carefully place the doily in the embroidery hoop and decide on the colours you wish to use for your pattern. I chose to use colours which matched (as much as possible) the existing embroidery on my doily.

3. When you have completed your embroidery, remove the doily from the hoop and iron carefully on the reverse side to remove any creases left by the hoop.

4. Next, lay your doily on your fabric choice to determine if you like how they look together. Keep trying different fabrics till you find a combination you love. (I used fabric from Tanya Whelan's Sugar Hill range.)

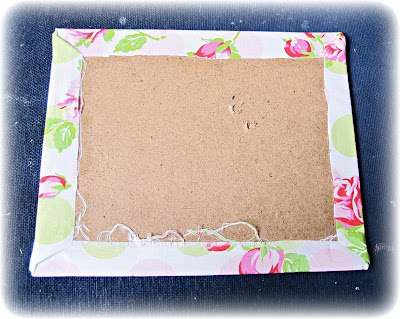
5. When you have decided on the fabric you want, cut it to size so that you have enough to wrap the front of the backing board from your picture frame, with a 2-3 cm overhang on all sides.

6. If you are sure that you won't want to change around the backing fabric in future, spray the picture frame backing board with spray adhesive and wrap the fabric around the board (do this in a well ventilated area). Fold over the overhang as you would when folding wrapping paper and adhere these to the back of the board with more adhesive. For a less messy (and less permanent) method, simply attach your fabric to the backing board using double-sided tape. Trim any messy edges if you want, but nobody will see this later so you can skip it if you're in a rush.

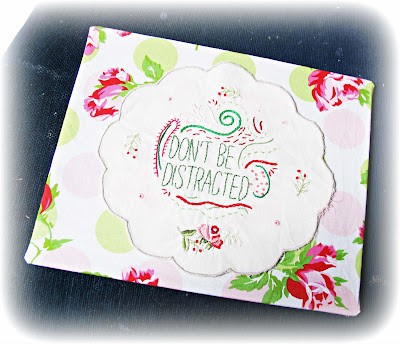
7. Turn over the fabric-covered board and place your doily on top. Decide on the position of the doily before attaching it with a little spray adhesive. Alternatively, you can simply place the doily on the fabric-covered board and trust the tightness of the glass and board in the frame to hold the doily in place.

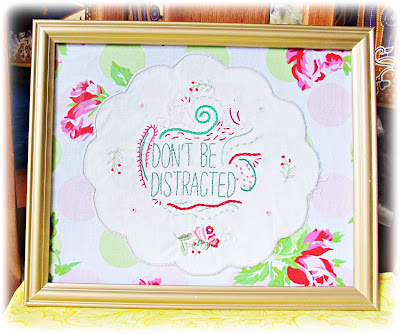
8. Carefully place your shabby chic artwork into the picture frame and secure into place. Now hang up your new artwork in a corner of your home which needs some cheering up!


No comments:
Post a Comment
I love finding out what my readers think, so thanks for taking the time to leave me a comment!