Monday, 30 September 2013

A Few of My Favourite Things

I've put together a whimsical post today to share my "sad, but true" love of op shopping with you!  While it may seem to Mr Cheeky Monkeys that everything in op shops is grist to my mill, I definitely do have specific items I hunt for in such shops.

image royal standard teacup fine bone china 2190 pink roses gold

One of my favourite things to hunt for in second hand stores is vintage bone china!  Not only do I use my finds in my upcycling adventures, but I love using vintage crockery as (shock, horror) crockery and as photo props (as seen above).

image vintage linen 1980s bedding doona cover sarah kay 1970s

I also love to look for vintage bedding when I visit an op shop.  I have found some beautiful designs which reminded me of my childhood, including this Holly Hobbie-influenced Sarah Kay doona cover.  Quite frequently Mr Cheeky Monkeys and the Two Cheeky Monkeys will love a vintage bedlinen find so much that they insist I add it to our linen cupboard for future use!  Any finds which are unuseable in their current state end up in my fabric stash to turn into something useable once again.

vintage tablecloth embroidered cross stitch doily crochet linen

A third favourite thing to hunt for is vintage doilies and embroidery.  As you all know, vintage doilies often end up being used in my creations, but did you know that I also use them as photo props?  Larger finds, such as this embroidered doily-style tablecloth are too beautiful to use in any way other than their origianl purpose.

image vintage bailliere's nurses' medical dictionary margaret hitch

A final favourite thing I look for at op shops is, of course, books.  I love books of all kinds, and although my family thing me a bit odd, I love to find old medical books and dictionaries, vintage Golden books and vintage novels and literature (such as the vintage copy of The Silmarillion I found last year).  So now that I have indulged in some whimsy, tell me, what are your favourite things to look for when you visit an op shop or second hand store?

Thursday, 26 September 2013

More Birthday Party Goodness


I am sharing a super short post today since the Two Cheeky Monkeys family is enjoying a well-earned break in the sunshine and warmth.  Last week I showed off the gaggle of cupcake stands (what is the collective noun for cupcake stands, anyway???) I had made for Monkey #1's birthday party.  Today I want to share photos of her birthday cake (yes, cake decorating is really outside of my artistic capabilities) and the cork drink coasters her guests decorated while discussing the various issues relevant to seven and eight year olds, he he.  For those of you wanting to decorate your own drink coasters, I got the idea from the fellow fellow blog.

Monday, 23 September 2013

Shabby Chic Wall Art Tutorial

As promised the other week, I have put together a tutorial for making your own shabby chic wall art.  You may already have some, or all, of the required supplies on hand, which would make this a very affordable and quirky piece of art for your walls!  If you are looking for a fun pattern to use, be sure to visit the Wild Olive blog for lots of free patterns as well as patterns available for purchase.

image shabby chic wall art tutorial diy embroidered doily vintage flowers floral

Supplies
- vintage cotton or linen doily
- embroidery pattern of your choice
- embroidery floss to match or complement any embroidery already on the doily
- embroidery needle
- embroidery hoop
- scissors
- fabric to match or complement the embroidered doily, you will need enough to wrap the backing board of the picture frame
- picture frame large enough for framing the doily (I used a slightly battered frame from my local op shop)
- spray adhesive or double-sided tape

Method
1. Make sure your doily is as clean and wrinkle free as possible.  This can be a little difficult with vintage doilies, but can be done with a little care.  Next, lay your doily over your intended embroidery design to make sure it fits nicely into the available space.  If your design is too small or too big for your doily, you can adjust the sizing with your photocopier or photo editing software.

image shabby chic wall art tutorial diy embroidered doily vintage flowers floral

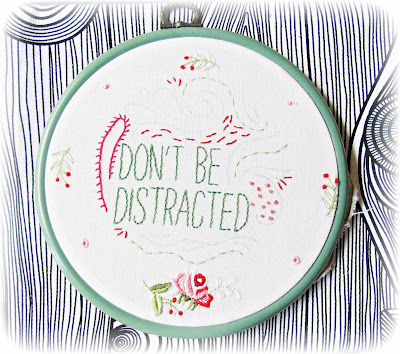
2. Transfer the embroidery pattern to the doily using either a lightbox (or well-lit window) to help you trace the design or an iron-on pattern transfer method.  Carefully place the doily in the embroidery hoop and decide on the colours you wish to use for your pattern.  I chose to use colours which matched (as much as possible) the existing embroidery on my doily.


3.  When you have completed your embroidery, remove the doily from the hoop and iron carefully on the reverse side to remove any creases left by the hoop.

image shabby chic wall art tutorial diy iron doily on reverse side to remove creases

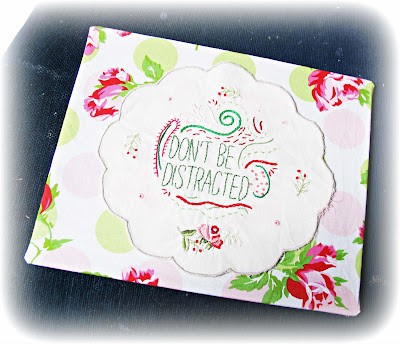
4. Next, lay your doily on your fabric choice to determine if you like how they look together.  Keep trying different fabrics till you find a combination you love.  (I used fabric from Tanya Whelan's Sugar Hill range.)

image shabby chic wall art tutorial diy embroidered doily vintage flowers floral

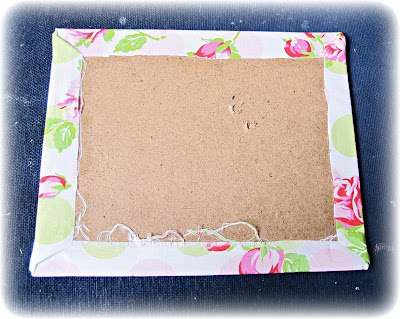
5. When you have decided on the fabric you want, cut it to size so that you have enough to wrap the front of the backing board from your picture frame, with a 2-3 cm overhang on all sides.

image shabby chic wall art tutorial diy cut fabric to wrap backing board with a little overhang

6. If you are sure that you won't want to change around the backing fabric in future, spray the picture frame backing board with spray adhesive and wrap the fabric around the board (do this in a well ventilated area).  Fold over the overhang as you would when folding wrapping paper and adhere these to the back of the board with more adhesive.  For a less messy (and less permanent) method, simply attach your fabric to the backing board using double-sided tape.  Trim any messy edges if you want, but nobody will see this later so you can skip it if you're in a rush.

image shabby chic wall art tutorial diy wrap backing board with fabric

7. Turn over the fabric-covered board and place your doily on top.  Decide on the position of the doily before attaching it with a little spray adhesive.  Alternatively, you can simply place the doily on the fabric-covered board and trust the tightness of the glass and board in the frame to hold the doily in place.

image shabby chic wall art tutorial diy attach doily to fabric covered board


8. Carefully place your shabby chic artwork into the picture frame and secure into place.  Now hang up your new artwork in a corner of your home which needs some cheering up!

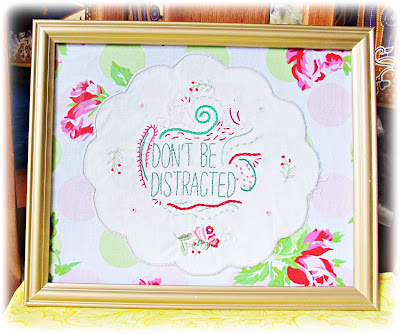
image shabby chic wall art tutorial diy embroidered doily vintage flowers floral framed

Friday, 20 September 2013

Cupcake Stand Party Favours

 
  Just some of the cupcake stands I've been making!

This week my creative space has been filled with cupcake stands and various party favours!  We are celebrating the birthday of Cheeky Monkey #1, and she requested some Domum Vindemia cupcake stands to give to her friends (in keeping with the "afternoon tea party" theme of the party).  Of course, we couldn't just give her guests a cupcake stand, we had to add other handmade goodies too (though the lollies weren't handmade).  I hope our guests enjoy their tea party favours!

Wednesday, 18 September 2013

Mr Darcy Bridal Necklace Sets - Oh My!

image bridal locket necklace set silver pearl mr darcy jane austen pride and prejudice wedding literature

Yes, you read right, I have finally branched out into the big scary world of creating jewellery sets for bridal parties!  Because of the popularity of the literature brooches with many brides, I decided to create something for them to give to their bridesmaids too.

image bridal locket necklace set silver pearl mr darcy jane austen pride and prejudice wedding literature

Brides will be able to customise their Mr Darcy locket necklaces with a large range of bead colours and finishes from which to choose.  I am so excited about this venture that I will also be adding Jane Eyre necklace sets to the range and am considering other favourite literary classics.  Of course, looking at my bead colour choices has left me with the burning question: What was your wedding colour scheme?

Tuesday, 17 September 2013

We have a winner!

image rainbow pastel necklace filigree cabochon vintage flower floral copper two cheeky monkeys

Thank you to everyone who entered my Pastel Rainbow necklace giveaway!  There were over 300 entries and I cannot believe how many people have signed up for my all new newsletter.  Unfortunately, there is only one winner, who is, without further ado:

 Julie B., who commented that she loved the Jane Eyre Locket necklace (see below) because Jane Eyre is "One of my fave novels, and I love lockets, and coral is something I'm always drawn to."

image jane eyre locket necklace rosaline pink peach bird swallow brass two cheeky monkeys literature

Julie has been contacted and I hope the Pastel Rainbow necklace brings her many smiles and compliments.  For the rest of my loyal blog and newsletter readers, stay tuned for next month's newsletter.  Each month I will be offering special discounts or giveaways exclusively to my wonderful subscribers.

Monday, 16 September 2013

Spring Has Sprung

image flower red yellow lachenalia aloides

Now that Spring has finally come to Melbourne (and oh boy, is my allergy-prone nose telling me that it's Spring!) I am really enjoying the bloom of flowers in my garden.  This rush of bright and beautiful colours usually starts at the end of winter with the arrival of the daffodils and jonquils and continues throughout Spring with the grape hyacinths, Lachenalias and freesias and other Spring bulbs.  I adore the riot of colour in my garden, especially after a dreary Melbourne winter!  What is your favourite Spring flower?

image purple grape hyacinth muscari flower bulb

Friday, 13 September 2013

Vintage Beauties Revived

image pansies dessert pedestal stand domum vindemia handpainted plate yellow purple vintage hand painted

There has been a flurry of cupcake stand-making in the Two Cheeky Monkeys household of late because I have been ignoring my gorgeous vintage crockery for far too long and because Monkey #1 has asked me to make a cupcake stand for each of the guests attending her upcoming birthday party.

image cupcake stand aynsley vintage teaplate maroon burgundy yellow triangle gold floral domum vindemia

I am especially enjoying making this current batch of new cupcake stands because I managed to source an amazing selection of vintage, hand painted plates for Domum Vindemia (as well as vintage, commercially-made plates).  For someone who doesn't paint or draw very well, I am always blown away by the beautiful designs others have painted.  Many of the plates I rescue also bear the original artist's signature (and often a date too) on the underside, adding some extra interest and "back story" to my delightful finds.  Do you love vintage, handpainted plates, or are you more a fan of contemporary designs?

image forget me not hand painted handpainted domum vindemia cake stand dessert blue hearts wedding

Wednesday, 11 September 2013

My Creative Space

image doily art shabby chic embroidered vintage doily cotton embroidery wall art framed red green pink

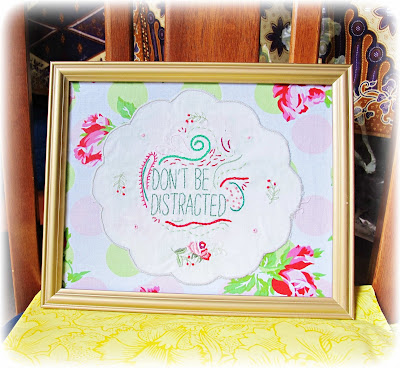
When I got a little obssessed with adding embroidery to vintage doilies earlier in the year, I worked up a fun Wild Olive pattern onto a beautiful, but relatively plain cotton doily.  This poor doily sat around for quite a while before I decided to frame it and turn it into a piece of shabby chic art for my home.  I had a lot of fun stitching up Mollie's whimsical design (check out her blog for more sweet embroidery patterns) and I love the combination of the vintage doily and its original embroidery with the new embroidery pattern.  For those of you wanting to know how to make something similar for your home, keep watching the blog, I'll be sharing a DIY in a week or two!

Monday, 9 September 2013

Contrasts Bracelet DIY

image tutorial diy contrasts bracelet freshwater pearl purple

I have a tendency to wear pearls in a rather traditional way (you know, the traditional pearl necklace, pearl earstuds or simple statement pearl pendant), so I decided it was high time I mixed things up a little!  I made the Contrasts bracelet to highlight the beautiful freshwater pearl by using beads which contrast in shape, texture and colour (get the name now?) for the rest of the bracelet.  Here's how you can make one for yourself!

Supplies
- one potato-shaped freshwater pearl, approx 8mmx10mm in size, or a similar-sized oval glass pearl or gemstone
- four faceted rondelle beads, 6x8mm in size
- 8mm round glass beads (the number you need will depend on your wrist size)
- nylon coated beading wire, 15-22cm, depending on wrist size
- two bead end crimps/calottes
- two bead crimps
- two 7mm jump rings
- one lobster claw clasp
- superglue

Method
image tutorial diy contrasts bracelet freshwater pearl sort beads in design you like

1. Lay out your beads in the following order: the freshwater pearl goes in the middle flanked by two faceted rondelle beads, next place the round glass beads on either side of the rondelles, finally add one rondelle to each end of the bracelet.  Make sure that there is a nice contrast in texture and colour between all of your beads.  Substitute with different beads if you're not happy with the look you have achieved.

image tutorial diy contrasts bracelet freshwater pearl purple thread bead crimp and calotte onto tiger tail

2. Thread a calotte/end crimp onto the nylon-coated wire followed by a crimp bead.  Squash the crimp bead close to the end of the nylon wire.  Add a dab of glue in the cup of the calotte, lay the wire and squashed crimp in the glue and crimp shut the calotte.

image tutorial diy contrasts bracelet freshwater pearl purple thread beads onto nylon coated wire

3. Thread your beads onto your tiger tail, or nylon coated beading wire.  Finish off the other end by repeating step two.

image diy tutorial contrasts bracelet freshwater pearl attach clasp to the ends of the bracelet

4. Open up one of the jump rings and attache the lobster claw clasp to one end of the bracelet.  Attach the remaining jump ring to the other end of the bracelet.

image diy tutorial contrasts bracelet freshwater pearl rondelles gold arm party

5. And there you have it - your very own Contrasts bracelet to add to your arm party!  The best part about this bracelet is that you can make a tonne of variations simply by using different beads.  Don't like pearls?  Then subsitute the centre bead with a a similar-shaped glass, gemstone or metal bead.  The only rule to remember is that your flanking beads should contrast beautifully against the central bead.  Mix and match your faceted, smooth and oddly shaped beads to produce your personalised Contrasts bracelet.  :)

Thursday, 5 September 2013

Bernadette Gets a Cover

Okay, so I am a little ashamed to admit that, even though I've owned my sewing machine (Bernadette) for five years, I have only just gotten a cover for her to keep all the dust off.  Slack, I know, but I think it was partly due to my rather hopeless dream of finding a hard, protective cover for her (this model doesn't have hard covers made to fit them).

image sewing machine cover purple aqua turquoise blue yellow peacock kate spain cuzco moda charm pack

Anyway, after looking at this very easy tutorial over on the Sew Delicious site, I finally found the time to make faithful Bernie a cover for her very own.  This fabric sewing machine cover tutorial is very easy to follow, though I did make a few alterations to suit my sewing skills (I didn't quilt my cover).  I used Kate Spain's Cuzco charm pack for the outside of the cover, and a vintage pillowcase for the lining.  The bias binding was leftover from this project.  I know not all of my seams are perfectly placed, but I'm still pretty pleased with the final result.

image sewing machine cover purple aqua turquoise blue yellow peacock kate spain cuzco moda vintage paisley pillowcase white

Do you sew?  And if you do, did your machine come with a cover, or did you make one for it?  Let me know!

Tuesday, 3 September 2013

Introducing the Two Cheeky Monkeys Newsletter and a Giveaway

Today I am very, very excited to announce that I have finally plucked up the courage to start a monthly (or maybe bi-monthly) newsletter!  Newsletter subscribers will receive exclusive discounts and advance notice of upcoming events as well as getting sneak peeks of new creations.  But this is not just a newslettter sharing Two Cheeky Monkeys and Domum Vindemia news, I will also be sharing links to craft tutorials, recipes and amazing handmade creations.

image pastel rainbow necklace two cheeky monkeys red orange yellow green blue flower floral cabochon filigree antiqued copper

In celebration of my newsletter launch (and the fact that it is officially Spring here in Australia), I am running a giveaway for a Pastel Rainbow necklace from this Spring's range of filigree cab necklaces.  This giveaway is open to all entrants worldwide and will run until Tuesday, September 17, 2013.  Simply use the Rafllecopter form below to enter the giveaway.  And I'd love it if you could let me know what you think about my new newsletter!

a Rafflecopter giveaway