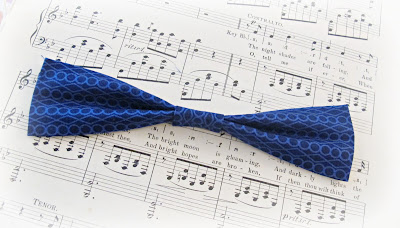
You may have noticed that the two cheeky monkeys and I are pretty keen on bows, especially bows which can be worn in one's hair or on one's clothes (see here, here and here). And I have noticed that bows are pretty popular amongst my monkeys' friends and the other girls at monkey #1's school (as evidenced by the number of bow hair ties which sold at the school fete), so I thought I would share a series of tutorials focussing on bows. Today's tutorial covers my method of making no sew bows - that's right, this is a tutorial even those of you who don't like sewing can easily attempt!
Materials
- One piece of fabric twice the length and width of your intended bow size
(for my 18 x 4.5cm bow I cut a 36 x 9cm piece of fabric)
- A small piece of fabric 8cm long and twice the width of your bow centre
(e.g. for a 2.5cm wide bow centre, cut a piece 8 x 5cm in size)
- Fabric glue (you could also use a hot glue gun, but fabric glue will last much longer)
- Iron and ironing board (optional)
Method
1. Iron your two pieces of fabric to ensure that they are not crinkled or creased. Ironing your fabric at this point will ensure a neater finish.
2. Take your larger piece of fabric and fold it in half lengthwise; lightly mark the fold line on the wrong side of the fabric. Unfold your fabric and fold the long ends towards the centre line (wrong sides facing); iron down the folds if you want a crisp-edged finish to your bow.
3. Mark the centre of your folded fabric widthwise and then fold the two shorter ends to the centre line. As before, iron down your folds if you want a crisp finish.
4. Take your second piece of fabric and fold the long ends towards the centre as you did with the first piece of fabric in step one. Iron the folds to keep them in place, if you wish. This will be the band around the centre of your bow.
5. Turn over your first, large folded piece of fabric so that the folded side is facing down. Pinch or concertina fold the fabric lengthwise in the very middle to give your bow shape. Dab some fabric glue to hold the middle in place, if you wish, or you could add a few stitches in matching thread to keep your bow together (although that would negate the "no sew" part, strictly speaking).
6. Add a stripe of glue to the middle underside of your bow and firmly press one end of your smaller strip of folded fabric onto the glue. Making sure that your second piece of fabric is exactly in the middle of the bow, wrap it around the bow to make the band around the bow centre.
7. Cut off any excess fabric, but make sure that you have enough fabric to fold under and hide the raw edges. Glue the raw edges under your strip of fabric then glue the neatened end of your strip in place to complete the bow centre. For those of you who aren't afraid of a needle and thread, you can add a few stitches around the join to make sure your bow centre is 100 percent secure. And there you have it - a simple, no sew, bow which you can make in less than thirty minutes!
Variations
- If you want to make a double-layered bow, simply repeat steps one and two with a slightly smaller piece of fabric and then concertina fold your two bow bases together before wrapping with the bow band.
- For a more eye-catching effect, you can use a different, but complementary, fabric for the second layer of your bow or the band around the centre.
Don't forget to come back next week for an alternative bow technique which involves sewing!


No comments:
Post a Comment
I love finding out what my readers think, so thanks for taking the time to leave me a comment!