Friday 30 November 2012

Christmas Shopping

As the end of the year draws rapidly nearer, I thought I'd take the opportunity to remind everyone that if you're intending on buying Christmas presents from my stores, you need to take shipping times into account!
 
 
Because many of the items in Domum Vindemia are sent via parcel post (which generally takes longer), the shipping cut off dates are 14th December for Australian customers and 4th December for international customers.  While purchases made after these dates may still arrive in time for Christmas giving, you would do better to get in early and save yourself some stress!
 
 
The cut off dates for Two Cheeky Monkeys purchases are 16th December for Aussies and 7th December for international customers.  But again, it really is better to be organised, especially if you are shopping online.  And if you're still wracking your brain for gift ideas, here are a few suggestions:
 
image gold locket necklace navy pearl mr darcy jane austen pride and prejudice
For the bookworm or literature buff: Mr Darcy locket necklace
 
image neon yellow bracelet vintage stones mr darcy pride and prejudice jane austen two cheeky monkeys
For the fashion conscious person who follows each season's colour trends: Mr Darcy neon bracelet
 
image vintage glam it up earrings kiahla montana blue hyacinth orange
For the party girl: Kiahla earrings
 
image vintage dictionary page art print camera kodak black and white
For the art lover or hard to buy for male: Dictionary page art prints
 
image eleanor cake stand vintage upcycled purple flowers
For the hostess extraordinaire: Eleanor cake stand
 
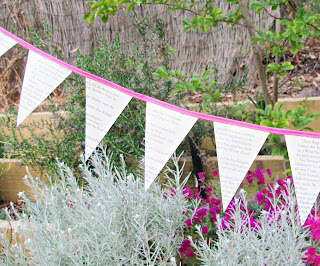
image fraulein bunting vintage book page german pink
Teacher appreciation gift: Fraulein bunting


Wednesday 28 November 2012

Afternoon Tea, Anyone?

image felt food toys macarons pink green yellow purple
Strawberry, pistachio, blueberry and lemon macarons!

I had grand plans to work on new additions to my Pride and Prejudice and Glam It Up ranges of jewellery for Two Cheeky Monkeys, but that all changed when my new supplies didn't arrive and my lovely little sister asked me if I would accept a commission to make a few sets of felt food toys.

image felt food toys tea teabags bags
Tea bags all ready to be sewn and stuffed.

She really wanted sets of afternoon tea and dessert-themed food toys to give to some of the little girls she knew and after some discussion we agreed on a set of items which should hopefully please any little girl.  There will be macarons, jam and iced biscuits (or cookies to my north American friends), tea bags (of course) and a range of cupcakes and swiss rolls.

image felt food toys biscuits cookies iced jam
The icing and jam parts are sewn on first by hand before I finish sewing and stuffing the felt biscuits/cookies.

Of course, the two cheeky monkeys have been eyeing the progress of the felt toys with great interest and have commented that, "You haven't made us any felt macarons!  Can we have some please???"  So can you guess what I'll be making after I finish this lot of felt food toys for my sister?

Monday 26 November 2012

Things I Love - Christmas-Themed Desserts

Well, you all probably know me well enough by now to know that I LOVE to celebrate Christmas - what Christian wouldn't, right?  But I also do love the effort people put into making cute Christmas treats and desserts to give to their friends and family.  Here are just a few I am loving today.
 
image christmas tree cupcake green red yellow star
 
image angel cookie biscuit christmas
 
image macaron holly christmas
 
image christmas tree cake ruffle green white
image christmas tree cake ruffle inside surprise bauble red green


Friday 23 November 2012

Customising Creations

One of the hardest things I find about creating handmade items is deciding which colours and styles to focus on for my stores.  Because, while I would love to make each item in a rainbow of colours or make matching earrings for every necklace I create (or vice versa), it is just not practical for me to do so.  Which is why I love it when customers ask me to create something I might not have otherwise had a chance to make!
 
image trephina necklace black red pink green two cheeky monkeys
A pink and green variation of the Trephina necklace.
 
Sometimes a custom order is very simply a colour variation of a pre-existing design.  I love these kinds of custom orders because I often get to use colour combinations I might not ordinarily stock.
 
image chantal glass pearl earrings and bracelet set gold rhinestone rondelles bridal
A bride-to-be requested a matching bracelet to go with the Chantal earrings she purchased for her bridesmaid.
 
Another favourite kind of custom order is when I am asked to make a piece of jewellery to match a creation a customer has previously purchased from me.  These kinds of orders often allow me to work on an idea which was already in my head or they can force me to think outside the box a little (such as the time a customer asked me to make non-dangly earrings to match a chunky ribbon and onyx necklace).
 
image pride and prejudice rings mr darcy mr wickham jane austen upcycled book page
A Mr Darcy ring inspired by a Mr Wickham ring!
 
And while many of my creations are of a limited edition or one of a kind nature, there is always the possibility for a customer to request a bespoke item inspired by something instore or an item which has already sold.  In this way, customers can obtain a creation which suits them and their needs even better than the original piece might have, due to the extensive discussions I have with them.
 
image vintage dictionary page art print grand piano vintage sheet music print violin
A sheet music and violin art print inspired by the grand piano dictionary page print.
 
Of course, my dictionary page prints are the items most commonly requested as custom creations!  Bespoke requests can range from simple requests for specific word definitions on the dictionary page to using sheet music or other vintage papers to adding images of a customer's favourite animal, instrument, vehicle, etc.  I have even had a customer request a quote to be added to the image design!
So let me ask you, when you see an amazing handmade creation which has already sold or isn't in your required colour scheme, do you discuss a custom order with its creator?  Or do you keep looking in other stores in the hopes of finding what you want somewhere else?  I'd be interested to hear your thoughts.   :)


Wednesday 21 November 2012

Scent of a Kitchen

image vintage powder box candle vanilla roses red yellow maude

I recently spent a day turning my stash of vintage teacups and powder boxes into container candles for Domum Vindemia.  I haven't finished filling all of my teacups yet, but my house has been smelling delightfully of vanilla ever since.  I loooove the scent of vanilla, but then I also loooove desserts and cakes, ha ha ha.

image teacup candle vintage loretta domum vindemia pink flowers

Each candle is made from standard, vanilla-scented candle wax and I am so in love with every single one - I don't want to sell them!  I stock candles in both my Etsy and Madeit stores, so you can shop at whichever site you prefer.  I only make vanilla-scented candles at the moment, but may one day branch out to other scents.  What are your favourite candle scents?


image teacup candle vintage-style willow-style blue and white ede

image vintage handmade powder box red roses candle vanilla scented
Beryl Candle

Monday 19 November 2012

Things I Love - Quirky Art

image mini terrarium lightbulb marimo moss light bulb upcycled

Although I don't display a lot of art around my home (mostly due to a distinct lack of free wall space), I have a passion for quirky artworks.  I love pieces which are a twist on the ordinary and many of the creations in the amazing eGarden Studio fall into this category.  In this fun store you can find old light bulbs transformed into mini terrariums and hanging displays full of moss as well as mini "aquariums" decorated with sand, shells and intriguing moss algae balls.  There are so many clever or cute pieces that I don't know which one is my favourite!

image test tube aquarium terrarium marimo moss ball

Friday 16 November 2012

Thank you for helping me to help others

image vintage thank you shabby chic

Back in August I was excited to reach some special milestones in my Two Cheeky Monkeys stores and I promised that I would tell you a bit more about how your purchases from both Domum Vindemia and Two Cheeky Monkeys go towards helping those who are in need.  But firstly, I would like to say THANK YOU once again to everyone who has made a purchase from my stores or from me in person.  You helped me to make a profit this last financial year - amazing!  Customer sales give me a big smile, help me to support my craft habit (he he he) and, most importantly, they also help those less fortunate than myself.
 
image TEAR Australia charity aid organisation

As I mentioned in that blog post back in August, I like to use some of my business profits to support charities which have a special place in my heart.  The first of these organisations is TEAR Australia, a "Christian development, relief and advocacy organisation responding to global poverty and injustice".  This year I have specifically supported their education and literacy work in Zimbabwe, India and Bangladesh.  As someone who has been privileged to receive education at pre-school, primary, secondary and tertiary levels, it saddens me to see that many around the world do not have the opportunity to receive even the most basic education due to poverty or prejudice.
 
image the forgotten cancers project
 
I also decided to support The Forgotten Cancers Project, an initiative being run by the Cancer Council of Victoria.  This project aims to study the causes of less common cancers in the hopes of eventually developing treatments and methods of early diagnosis.  I was excited to hear about The Forgotten Cancers Project because, as many of you know, I lost my beloved dad to an aggressive and comparatively rare cancer last year.  I was also extremely interested in this project because, having studied and worked in cancer research (in what feels like a lifetime ago), I know just too well how complex the field of cancer research is and how hard it can be to gain funding for research into a disease when there are few or no survivors to petition the government for funds.
 
On that note, I want to thank you all again for supporting my small home business.  It is gratifying to know that so many people love what I do and even more gratifying to know that I can support two causes which mean so much to me too.

Wednesday 14 November 2012

Adventures with shrinkies

image shrink plastic earrings red toadstool mushroom fly agaric filigree cross black

 Can I get a show of hands how many of you made shrinky dinks, shrinkies or shrank Twisties or other chip packets in the oven when you were kids (or got your mum to help)?  My sister and I absolutely LOVED the free shrinkies which came with the various boxed foods our mum bought for us (from memory, we got several out of cereal and snack boxes and possibly show bags too).  And I think she got a bit tired of us "shrinking" plastic packets in her oven.  Well that phase of my life came and went, but now it is back with a vengeance after I finally bought some inkjet printable shrink plastic!  I was so excited about my purchase that I have put together a step-by-step "tutorial" of what I did to rekindle my love of a fun childhood craft.

image grafix shrink film plastic shrinky

Supplies
 - inkjet printable shrink plastic - I used the Grafix brand, but Shrinky Dinks also make good quality printable shrink plastic
- inkjet printer (of course)
- marker pens for colouring in your shrinkies (this is optional as you could print your image in colour, I used Sharpies to colour my designs)
- greaseproof paper
- a heavy book (you'll need this in step 4, don't worry!)
- Varnish or sealant spray or clear embossing powder
- hole punch (optional)
- decorative cord (optional)

Method
image christmas ornament design layout in microsoft publisher before printing

1. Now if you're anything like me, you'll want to minimise wastage of your shrink plastic as much as possible.  To do this, I recommend laying out your intended designs in a program such as Publisher, Illustrator or Corel Draw to maximise use of your plastic.  My shrink plastic instructions said to size my image 50% larger than the intended final size, to allow for shrinkage.  However, I found that the final shrunken size was actually a bit smaller than expected, so next time I might increase my images by 60% or so.  When you are satisfied with your layout, print your pictures onto your shrink plastic.
The Grafix shrink plastic came with instructions outlining how to determine the printable side of the plastic.  I had A LOT of trouble determining which side was the printable side, even following the instructions, and eventually found that both sides of the plastic printed without any problems.  I know that some shrink plastics are printable on both sides, so maybe mine came with outdated instructions?  Just bear all of this in mind when you are printing on your plastic.

image shrink plastic angels christmas ornaments strawberry before shrinking


2. Let your printer ink dry completely before cutting out your designs; also make sure your hands are completely clean and dry because smudges are near impossible to remove.  I should also have mentioned that intricate or very small designs can be hard to cut out accurately, so great care should be used at this point.  I wouldn't recommend letting your kids do any cutting out unless the designs are simple or you really don't mind bits being chopped off, etc.   :)  It is also VERY IMPORTANT to remember to punch holes for hanging if you are intending to use your shrinkies as charms or are planning to hang them on a cord or chain.  It is too late to make holes after your plastic has shrunk!

image colour in shrink plastic prior to shrinking using Sharpie pens

3. If you are planning to colour in your shrinkies by hand, now is the time to do it.  My oldest cheeky monkey wanted to know why we couldn't colour them in AFTER they had been shrunk and I had to point out that the designs would probably be too small and fiddly to colour in by then.  The only thing to note at this part of your project is that colours intensify and darken once the plastic has shrunk down in size.  This means that your beautiful mid-blue could easily become a dark blue in your final product.

image shrink plastic in oven at specified temperature christmas ornaments shrinkies

4. Once you are happy with your shrinkies, it's time to put them in the oven and watch them shrink before your eyes!  I lined a metal biscuit tray with greaseproof baking paper to prevent my shrinkies from sticking.  I'm afraid that I don't have a photo of my shrinkies shrinking in the oven as I was too busy controlling the overexcited cheeky monkeys around the hot oven and hot metal trays.  Don't be alarmed when your shrinkies start to curl up when they are shrinking.  They should eventually flatten out again, which is generally your signal to take them out of the oven.  At this point, I place another piece of greaseproof paper on top of my shrinkies and then flatten them with a heavy book to make sure that they are fully flat.

image shrinkie shrink plastic angel christmas ornament seal with varnish spray

5. Most shrink plastics recommend covering your shrinkie with some sort of sealant spray or top coat after baking to prevent moisture damage to your design.  I tried a polyurethane gloss spray on several of my shrinkies but found that it caused some of my colours to run/smudge into adjacent areas of the design (see the angel's wing and the decorations on her dress).  I don't know if this was due to my hasty (and probably inaccurate) application of the gloss spray or if Sharpies just don't mix with this type of varnish spray.

image shrinkies shrink plastic grafix mushroom strawberry seal shrinkies with clear embossing powder

6. Next I tried sealing my shrinkies with a layer of clear embossing powder.  I sprinkled a layer of the embossing powder onto my shrinkies and returned them to my greaseproof paper-lined tray.  Then I melted the embossing powder by placing my shrinkies under a hot grill, though you could just as easily use a heat tool/gun.  Remove the shrinkies from the heat source as soon as the powder has completely melted.
Unfortunately, my clear embossing powder contained glitter, making the shrinkies a little hard to photograph, but I think you get the point. I really liked "sealing" my shrinkies with the embossing powder - my only problem with this method was that the shrinkies tend to curl up a bit when re-heated to melt the powder.  You can't flatten the shrinkies with the heavy book once they have been embossed (it takes a while for the molten powder to harden), so you may have to try poking down any curling edges with your finger nails while trying not to ruin your finish.


So there you have it, a "how to" for making your very own shrinkies.  As you can see, you can make all sort of fun items with shrink plastic.  The two cheeky monkeys had a blast making ornaments for our Christmas tree as well as little charms to add to the keyrings they hang on their backpacks.  And I had fun making charms to embellish the quilted ball ornaments I am making for end of year teacher appreciation gifts as well as the teeny earrings you see in the first photo of this post.  Do let me know if you try making your own shrinkies, I'd love to see them!

Tuesday 13 November 2012

Christmas giveaway winners!

My apologies to everyone for not drawing this giveaway sooner, things have been pretty crazy here with our usual end of year madness and a new round of illness care of our severe hayfever-inducing weather in Melbourne.  Anyway, I have finally drawn two winners:


First prize goes to Hannah of Banana Orange Apple, who said, "I would give it to my mother since she is learning German and she would get a kick out of translating it."


The second prize goes to Rachael of Entwined Happiness who said, "Love the wreath card...so want to win it :)"

Congratulations to both these ladies!  For everyone else who missed out, stay tuned as there will be a pre-Christmas sale coming up soon as well as some fun tutorials.


Wednesday 7 November 2012

Relaxing With Sewing

image wristlet purse blue flowers vintage bedlinen fabric

Firstly, for those of you who are looking for my Christmas card and bunting giveaway, head over to this post after you've read about my latest sewing exploits!  You may have gathered from the post title that I am trying to rest and unwind after my flurry of activity last week in preparation for the launch of my new dictionary page card and paper bunting ranges.  In hindsight, trying to launch two new ranges of handmade items while highly hormonal (sorry for the overabundance of information!) and trying to entertain small children in the midst of a four day long weekend, was not a good idea.  But I did it, I survived and then was left with the desire to make something for myself.  Of course, that could have just been an excuse to play with my sewing machine now that she is working beautifully after being serviced!

image wristlet purse blue flowers vintage bedlinen fabric

Anyway, after lots of umming and ahhing and poring over my various craft books and magazines, I decided to make a little wristlet purse for myself.  The pattern is one I've been wanting to try for a while because firstly, I love bags, purses, clutches, totes, you get my drift, and secondly, it looked like a cute present idea I could whip up at the last minute if needed.  This little wristlet really was quite quick to sew once I'd finalised my fabric choices (some retro bed linen paired with contemporary quilting fabric) and deciphered the instructions (which were very well written until the second last, and most important, step).  The only change I made to the pattern was to add a magnetic clasp instead of attaching a press stud.  So now I have a cute wristlet I can carry when I walk my cheeky monkeys to school or use when I go out and only need to take the bare essentials of mobile phone, keys and my cards!  Perhaps I'll make some more to give away as presents...

Monday 5 November 2012

What's New and a Christmas Giveaway

image dictionary page greeting card chandelier iceberg white pearlescent

Yes, yes, yes, I have been playing around with lots of new ideas in recent times and today sees the official launch of the Two Cheeky Monkeys range of dictionary page greeting cards as well as an introduction to the new range of paper buntings and vintage paper confetti at Domum Vindemia!

image dictionary page christmas card wreath vintage

 For those of you who haven't been keeping up to date with my Facebook posts, the dictionary page greeting cards are an idea I have been contemplating for several years now but have only finally decided to pursue it.  They are currently available in two sizes, a "small" 12cm (4 inch) square card in textured white, and a "large" 11.5 x 18cm (4.6 x 7.2in) card in pearlescent white.  The dictionary page cards are available as both single cards and as packs of five to suit both my customers who like to buy "one offs" and those who like to stock up in bulk.  A variety of vintage images are featured on the greeting cards, although customers can always request a special image to suit their needs.

image paper confetti vintage german novel book page starburst shape

And inspired by my re-visiting of an old design idea, I also decided to act on my desire to add vintage paper buntings and vintage paper confetti packs to my range of Domum Vindemia creations.  For the moment I will only be making the paper buntings in a mini-bunting size, though this may change if I find the range to be uber popular.  The paper confetti packs will be sold as sets of 100 in four different shapes made from either old and unloved books or atlases.

image dictionary page card christmas wreath book page bunting paper german

So onto the giveaway!  As Christmas is rapidly approaching and I am unlikely to find time for any more giveaways this year, I am offering up a first AND a second prize to my lovely readers!!!  The first prize winner will receive a square Christmas wreath card and the prototype Fraulein bunting (made from bias binding and pages from an old German novel and approximately 2.3m long).  The second prize winner will receive a square Christmas wreath card and their choice of confetti packs.  How can you be in the running for one of these rather literary prizes?  Simply follow the instructions in the Rafflecopter form below.  The giveaway will run until Sunday, Nov 11 (AEDST) and is open worldwide.

a Rafflecopter giveaway