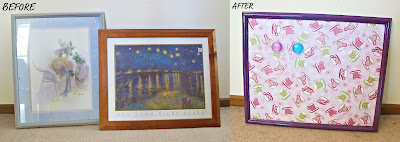
Materials:
- an old wooden picture frame in a suitable size (mine were approximately 40x50 cm inside the frame)
- sandpaper
- magnetic sheet metal cut to size to fit your frame (if you're in Melbourne, Springvale Steel is a great company to deal with)
- fabric to cover the sheet metal
- paint to complement the fabric (I used a glossy spray paint)
- spray adhesive or strong tape
Method:
Start by removing the glass and backing from your old frame(s). Keep the old backing to help hold the sheet metal in place once your repurposing has been completed. The glass fronts are of no use in this project but you may be able to use them for something else.
Lightly sand your frame to remove any faults and old paint or varnish and to prepare the surface for the new coat of paint. Remove any dust with a damp cloth and set aside the frame to dry.
Lay out a painting drop sheet (or a lot of newspaper) on a flat surface, preferably outside, and place your frame onto it. Working slowly and carefully, paint one layer of paint onto your frame and then leave it to dry. You can add an undercoat first if you wish, but I didn't bother. Once your first layer of paint has dried, add another layer of paint. I found that two coats of paint was enough with the paint which the cheeky monkeys chose.
This is what my magnetic sheet of metal looked like before I covered it with fabric. It is the same sheet metal as that used in commercial noticeboards and whiteboards. I chose this type of sheet metal for its magnetic properties and for the fact that it was white coated, which prevents rusting and also looks good should the monkeys ever decide to remove the fabric cover.
If, like my monkeys and me, you like to change things up every now and then, I recommend that you do the following. Lay out your fabric, wrong side up, on a flat surface and place the sheet metal in the centre. Fold the fabric over the edges as you would when wrapping a present and attach the fabric to the sheet metal by using strong packing tape to hold the edges down on the reverse side of the metal. If you want a more permanent finish to your project, I recommend the following: spray your sheet metal with a thin coat of spray adhesive. Carefully smooth the fabric over the surface of the metal and then let the glue dry. Once the front is dry, spray the back of the metal with more adhesive and fold the raw edges over to the back to neaten.
This is what your sheet of metal should look like from the front. If you have attached the fabric using packing tape, you still have time, at this point, to readjust the fabric to remove any air bubbles or crinkles you may have missed.
Once the paint on your frame has completely dried (I left my frames to dry overnight), insert your fabric-covered sheet metal into the frame and replace the frame backing to hold the metal in place. And there you have it, one pretty and useful magnetic noticeboard! This project can also be adapted for the males in your life, or anyone else for that matter, simply by choosing different fabrics for the metal board and paint finishes for the frame. If something didn't make sense in my garbled instructions, please don't hesitate to ask me for clarification. :)


very clever Deborah :-) must try this sometime...
ReplyDeletex