Yes, I know, ombre is all the rage and everybody loves ombre ANYTHING. But who couldn't love these amazing wedding cakes??? And the best part about ombre - you can celebrate your favourite colour in all its glory, he he he.
Monday, 30 April 2012
Monday, 23 April 2012
Things I Love...
Do you love shoes??? I do!!! Although I find it hard to buy exactly the kind of shoes I am looking for, it doesn't stop me from browsing through shoe stores both online and in B+M stores. And if buying and wearing beautiful shoes isn't enough, what about making some for use as gift tags or ornaments? I found this cute tutorial over at absolute bodo and I love it! Okay, so some of the designs might be a little too girly for me, but the look of these paper shoes is limited only to the scrapbook paper and embellishments you can find. I'm thinking that I might try making some to use as present toppers for all my really girly friends. What do you think?
Friday, 20 April 2012
Magnetic Noticeboard Tutorial
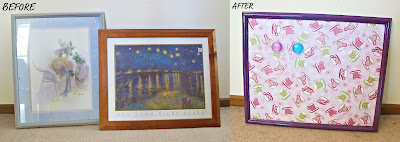
Okay, so I may have mentioned almost two months ago that I would put together a tutorial for the repurposed picture frame noticeboards I made for the cheeky monkeys. And you may have noticed that I still haven't posted a tutorial. Well...let's just say that I completely forgot all about it! Anyway, here is my tutorial as promised...finally. Here is how I turned two old and unwanted picture frames (found at one of our local op shops) into new and useful noticeboards!
Lay out a painting drop sheet (or a lot of newspaper) on a flat surface, preferably outside, and place your frame onto it. Working slowly and carefully, paint one layer of paint onto your frame and then leave it to dry. You can add an undercoat first if you wish, but I didn't bother. Once your first layer of paint has dried, add another layer of paint. I found that two coats of paint was enough with the paint which the cheeky monkeys chose.
Once the paint on your frame has completely dried (I left my frames to dry overnight), insert your fabric-covered sheet metal into the frame and replace the frame backing to hold the metal in place. And there you have it, one pretty and useful magnetic noticeboard! This project can also be adapted for the males in your life, or anyone else for that matter, simply by choosing different fabrics for the metal board and paint finishes for the frame. If something didn't make sense in my garbled instructions, please don't hesitate to ask me for clarification. :)
Materials:
- an old wooden picture frame in a suitable size (mine were approximately 40x50 cm inside the frame)
- sandpaper
- magnetic sheet metal cut to size to fit your frame (if you're in Melbourne, Springvale Steel is a great company to deal with)
- fabric to cover the sheet metal
- paint to complement the fabric (I used a glossy spray paint)
- spray adhesive or strong tape
Method:
Start by removing the glass and backing from your old frame(s). Keep the old backing to help hold the sheet metal in place once your repurposing has been completed. The glass fronts are of no use in this project but you may be able to use them for something else.
Lightly sand your frame to remove any faults and old paint or varnish and to prepare the surface for the new coat of paint. Remove any dust with a damp cloth and set aside the frame to dry.
Lay out a painting drop sheet (or a lot of newspaper) on a flat surface, preferably outside, and place your frame onto it. Working slowly and carefully, paint one layer of paint onto your frame and then leave it to dry. You can add an undercoat first if you wish, but I didn't bother. Once your first layer of paint has dried, add another layer of paint. I found that two coats of paint was enough with the paint which the cheeky monkeys chose.
This is what my magnetic sheet of metal looked like before I covered it with fabric. It is the same sheet metal as that used in commercial noticeboards and whiteboards. I chose this type of sheet metal for its magnetic properties and for the fact that it was white coated, which prevents rusting and also looks good should the monkeys ever decide to remove the fabric cover.
If, like my monkeys and me, you like to change things up every now and then, I recommend that you do the following. Lay out your fabric, wrong side up, on a flat surface and place the sheet metal in the centre. Fold the fabric over the edges as you would when wrapping a present and attach the fabric to the sheet metal by using strong packing tape to hold the edges down on the reverse side of the metal. If you want a more permanent finish to your project, I recommend the following: spray your sheet metal with a thin coat of spray adhesive. Carefully smooth the fabric over the surface of the metal and then let the glue dry. Once the front is dry, spray the back of the metal with more adhesive and fold the raw edges over to the back to neaten.
This is what your sheet of metal should look like from the front. If you have attached the fabric using packing tape, you still have time, at this point, to readjust the fabric to remove any air bubbles or crinkles you may have missed.
Once the paint on your frame has completely dried (I left my frames to dry overnight), insert your fabric-covered sheet metal into the frame and replace the frame backing to hold the metal in place. And there you have it, one pretty and useful magnetic noticeboard! This project can also be adapted for the males in your life, or anyone else for that matter, simply by choosing different fabrics for the metal board and paint finishes for the frame. If something didn't make sense in my garbled instructions, please don't hesitate to ask me for clarification. :)
Wednesday, 18 April 2012
My Creative Space
Yes, for those of you who remember this post, I finally finished sewing my pleated clutch purse! It took me a while to finish this cute little number, but I'm pleased with the final, if a little wonky, results. At first I thought this clutch was a bit too big, but it's actually quite convenient given that I still carry a host of essentials with me (tissues, bandaids, hand sanitiser, etc) for the two cheeky monkeys. Have you recently completed a long-standing project?
Wednesday, 11 April 2012
My Creative Space - Bracelets
I have had a lot of fun trying out various bracelet DIYs that I've been finding in blogland. And I've made so many now, that if I wear them all at once, it starts to look like I am seriously into my arm candy! For those of you who want to try making some of these for yourselves, most of the tutorials I followed (or adapted) can be found here and here. Have fun and please feel free to share any fun bracelet tutorials you have tried!
Monday, 9 April 2012
Things I Love...
Mmm...how delicious (literally!) is this cookbook by Korefe? It is made of fresh pasta sheets and is designed to be filled with ingredients and baked to produce a literary lasagne! Can you just imagine serving this up at your next dinner party?! It would certainly make for a good conversation starter. :)
Spotted on Craft Gossip.
Sunday, 8 April 2012
Lamb of God
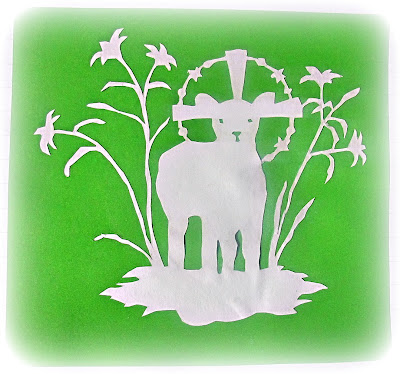
I have been trying my hand (a little unsuccessfully) at papercutting and this design (named The Lamb of God) seemed perfectly appropriate for Easter. The pattern is from the fantastic Scherenschnitte blog, where I have found previous inspiration for my papercutting attempts. It depicts a lamb with a cross behind its head, representative of Jesus, whom Christians celebrate especially at Easter as being the lamb of God.
'The next day John saw Jesus coming toward him and said, “Look, the Lamb of God, who takes away the sin of the world!" ' John ch. 1 v. 29 (NIV)
Friday, 6 April 2012
Some Easter Fun
I know this is kind of different from my usual Easter post where I share amazing handmade creations which represent Easter. But I couldn't resist sharing this cartoon which I found on the John Hart Studios website. It made me giggle and it really does sum up Easter for me. :)
Tuesday, 3 April 2012
Easter Market Night
You should all know by now just how much Easter means to me and how I enjoy the quiet celebrations and church services that we have at this time of year. I've decided to extend my celebrations to my handmade stores and will be running a market night this Wednesday April 4th, starting at 8pm (AEST). I'll be running the sale via Facebook and yes, everything is half price, which is a BARGAIN. There will be a mix of old and newer jewellery designs and items which are the last of various limited edition ranges. If you want a chance to start shopping before everyone else, pop your name down under this post and I'll pick a winner tomorrow lunch time!
Monday, 2 April 2012
Domum Vindemia Giveaway Winner
Unfortunately, there can only be one winner, but a big thank you to everyone who joined in my 2nd blogaversary fun and shared this giveaway with their friends. For those of you who didn't win, I am offering an Easter celebration discount - just enter the coupon code SALE10 at checkout when you purchase from my Etsy store to receive a 10% discount. So, without further ado, the winner of the cocktail napkin set of their choice is...
...entry number 14, which is Judy of Angels n Everlastings! If you're based in the US, Judy makes some beautiful silk flower wreaths, go and check them out. Congratulations Judy!
Subscribe to:
Comments (Atom)


