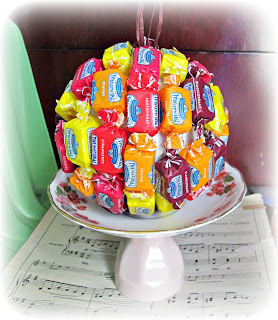
It's been a while since I've put together a tutorial for this blog so I thought I would share a quick tutorial for the edible Christmas ornaments I made as small thank you gifts this year. My idea for these came from the various Christmas trees and wreaths I've seen in blogland which have been made with a variety of lollies and candies.
Materials
Styrofoam balls (I used 9cm balls)
Curling ribbon, raffia or decorative cord
Hot glue gun and glue sticks
Lollies/candies/sweets of your choice (I used wrapped, soft chew lollies but use whatever is your favourite and make sure you have enough to cover your entire ball)
Method
The most important thing to do first is to turn on your hot glue gun so that you don't have to twiddle your thumbs while you're waiting for it to heat up! If, like me, you are terrible at estimating mid points on objects and/or a bit OCD about things being precise, measure your foam ball and mark the top and bottom (or north and south pole, if you like). This will give you a guide for attaching and tying the ribbon hanger for the ornament.
Cut a length of the curling ribbon so that it is long enough to wrap around the foam ball as well as tie into a loop for hanging. Find the mid point of your ribbon and glue this to your marked point on the bottom of the ball. Following the manufacturer's line that usually runs around the middle of foam balls, wrap both ends of the ribbon around the ball and tie a double knot at the mark on the top of the ball. Glue the knot down and then tie the ends of the ribbon to make a ribbon loop for the ornament.
Okay, now for the fun part! Trying not to eat too many of your supply of lollies, glue a row of lollies around the middle of the ball, covering up your ribbon as you go. I think at this point that I should suggest using a low melt glue gun so that the hot glue doesn't melt your foam ball or your lollies. The added advantage of low melt glue guns is that your screams of pain will be less if you should accidentally put your fingers on the glue instead of the lollies (as I did a few times because I'm uncoordinated).
Once you have attached the first row of lollies, keep gluing on rows of sweets, making sure to pack them as close together as possible so that the foam ball doesn't show through. Keep reminding yourself that you cannot eat too many of the lollies or you won't have enough to cover the foam ball!
Once you have completely covered the foam ball in lollies, you can hang it up to display! If you are giving these as gifts, you might like to wrap them in cellophane or tissue paper to add an element of surprise to the gift, or you could include one as part of a festive foods hamper. The beauty of using wrapped lollies, as I have done, is that your recipient can safely eat the goodies attached to the foam ball without worrying about how much glue (or germs from inquisitive and grubby little fingers) they're consuming in the process! The possibilities are endless with this project, limited only by the availability of suitable lollies at your local store. For those who would like to use unwrapped lollies or candies, you could try attaching your lollies to the foam ball with icing or melted chocolate to eliminate the worries about mixing glue and food.


No comments:
Post a Comment
I love finding out what my readers think, so thanks for taking the time to leave me a comment!